목차
- 프롤로그
- WebRTC의 동작 원리
- Signaling Flow
- 마치면서
1. 프롤로그
채팅을 구현하기 위해서는 지속적인 연결을 유지하는 웹소켓을 사용한다. 웹소켓에서는 A가 B에게 채팅을 보낼 때 두 사용자가 직접 연결되어 있는 것이 아니라 서버의 중개를 통해 대화를 나누게 된다. 그러니까 A가 채팅을 보내면, 서버로 전송되고, 서버는 해당 채팅방을 구독하고 있는 사용자들에게 메시지를 보내주는 것이다. 이 방식은 클라이언트의 수가 늘어날수록 서버에게 큰 부담이 된다. 간단한 텍스트를 보낼 때는 오버헤드가 작을 수도 있지만, 주고받는 데이터가 영상이나 오디오처럼 용량이 크다면 서버의 부담이 엄청날 것이다.
WebRTC(Web Real-Time Communication)는 서버의 중개 없이 클라이언트끼리 직접 소통한다. 이로 인해 서버는 데이터를 처리할 필요가 없어지고, 클라이언트끼리 직접 소통하다 보니 빠르게 소통할 수 있게 된다.
아래 링크에서 간단하게 체험해 볼 수 있다.
https://webrtc.github.io/samples/src/content/peerconnection/pc1/
2. WebRTC의 동작 원리
2.1. Signaling
두 피어가 서로 통신을 시작하기 전에 서로의 정보를 교환할 필요가 있다. 서버가 이를 중계해 주는데, 이를 signaling server라고 한다. 즉, 브라우저는 서로가 무엇으로 어떻게 소통할 수 있는지 signaling server를 통해 정보를 교환하게 된다. Signaling 자체는 WebRTC의 일부가 아니기 때문에 웹소켓이나 HTTP 등 외부 protocol을 사용해서 구현해야 한다.
2.2. ICE (Interactive Connectivity Establishment)
ICE는 네트워크 경로를 설정하기 위해 사용되는 protocol이다. 이는 여러 종류의 candidate(후보)를 사용해서 연결을 시도하는데, 각 ICE Candidate에는 클라이언트들이 각각 소통에 사용할 수 있는 네트워크 경로들의 정보가 담겨 있다.
Host Candidate
같은 로컬 네트워크에 속한 경우이며, 각 기기의 네트워크 내부용 주소인 private IP 주소와 포트 번호를 교환한다.
Server Reflexive Candidate
NAT** 뒤에 있는 경우이며, STUN 서버**를 사용하여 public IP 주소와 포트 번호를 알아내어 ICE Candidate으로 등록한다.
**NAT이란?
내부 네트워크의 private IP 주소를 public IP 주소로 변환하는 방법으로, NAT을 통해 외부 네트워크와 통신할 수 있게 된다.
**STUN 서버란? (Session Traversal Utilities for NAT)
상대방에게 알려줄 나의 주소를 알아내기 위해 STUN 서버를 사용한다. NAT 뒤에 있는 기기가 STUN 서버에 요청을 보내면, 응답으로 public IP 주소와 포트 번호를 알려준다.
Relay Candidate
네트워크 환경이 복잡하거나 방화벽 등에 의해 P2P 통신이 제한된 경우 TURN 서버**를 사용한다. 이때 추가적인 경로를 거치므로 지연 시간 증가와 비용이 발생한다.
**TURN 서버란? (Traversal Using Relays around NAT)
만약 STUN 서버를 통해서도 직접 연결이 불가능하면, 클라이언트는 TURN 서버에 자신을 등록하고, 데이터 전송 시 TURN 서버가 각 클라이언트로 데이터를 중계한다.
2.3. SDP (Session Description Protocol)
SDP는 피어 간의 연결 설정을 위해 사용하는 protocol로, ICE Candidate 정보를 SDP에 포함시켜서 상대방에게 전달한다.
3. Signaling Flow
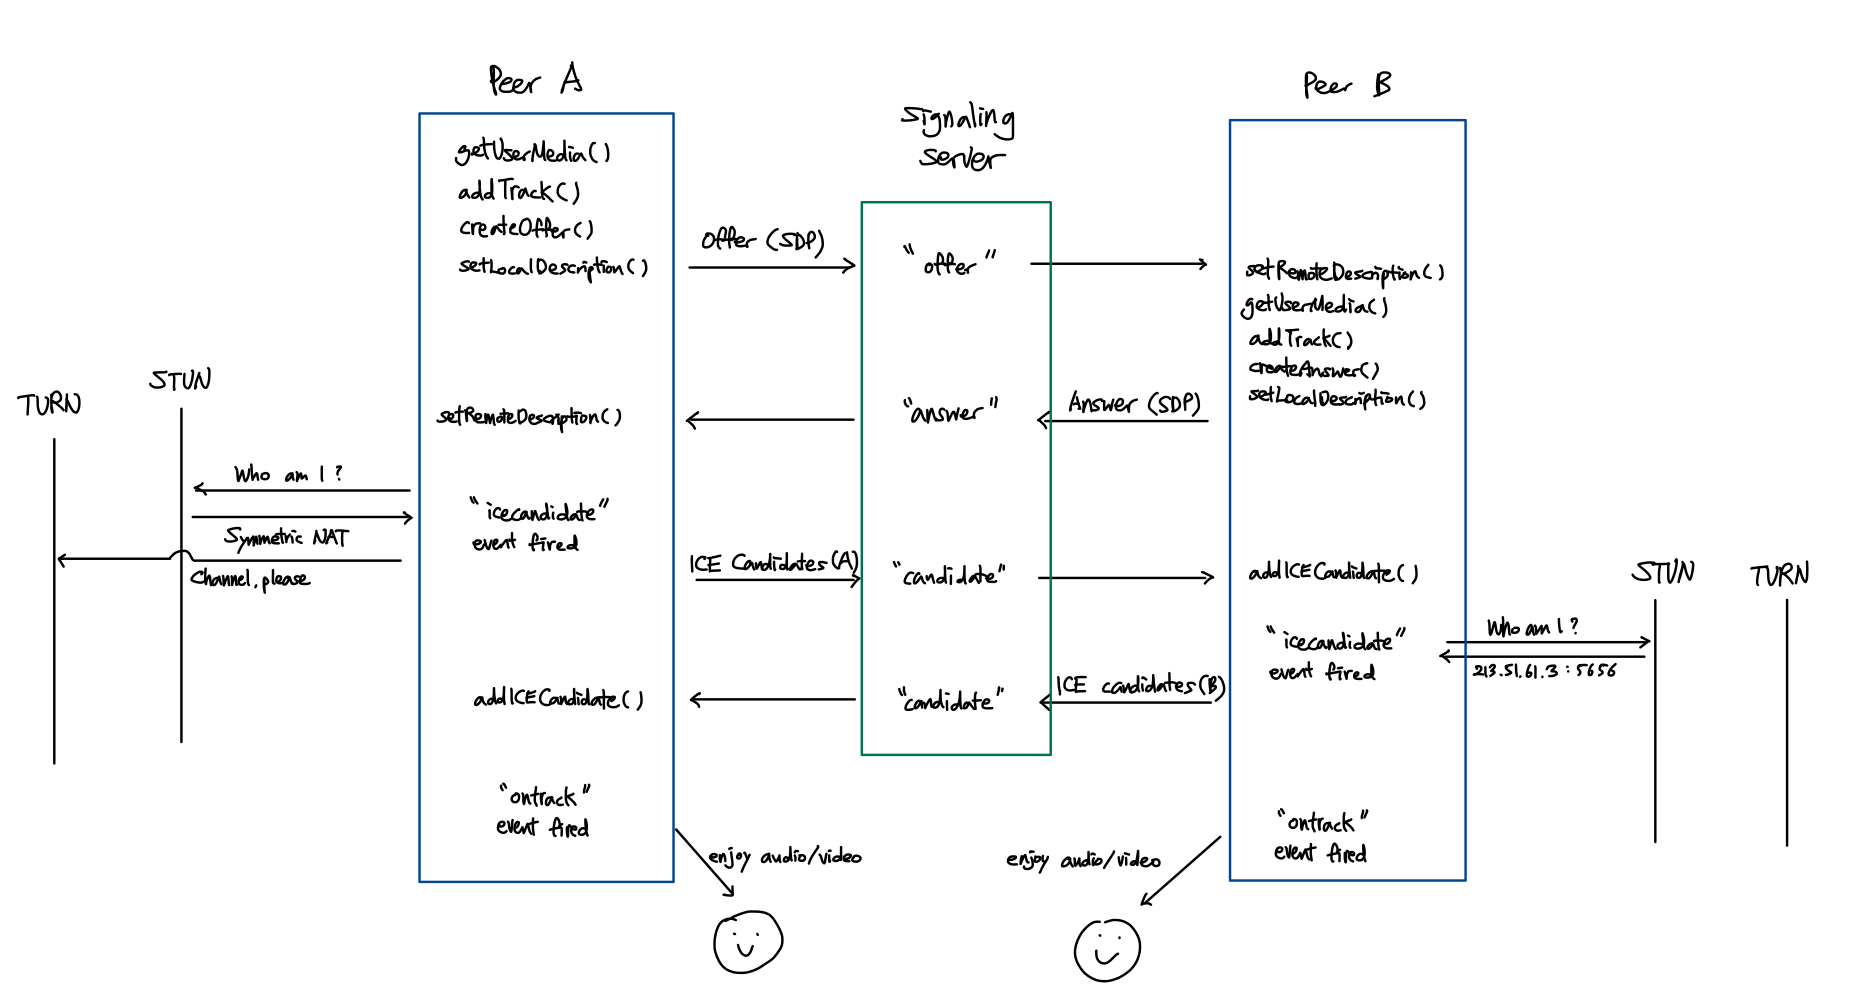
A가 B에게 화상 회의를 거는 상황이라고 가정해보자.
1. A는 자신의 media 정보를 stream에 추가한다 | getUserMedia(), addTrack()
const [localStream, setLocalStream] = useState<MediaStream | null>(null);

useEffect(() => {
    // Set up local media stream
    const constraints = { video: true, audio: true };
    navigator.mediaDevices
        .getUserMedia(constraints)
        .then((stream) => {
            setLocalStream(stream);
        })
        .catch((error) => {
            console.error('Error accessing media devices.', error);
        });


     // Add local stream to peer connection
    if (localStream) {
        localStream.getTracks().forEach((track) => {
            peerConnectionRef.current?.addTrack(track, localStream);
        });
    }
}, [])
참고
cameras, microphones -> navigator.mediaDevices.getUserMedia()
screen recording -> navigator.mediaDevices.getDisplayMedia()
2. A는 offer를 생성하는데, offer에는 localStream을 담고 있는 SDP가 담겨 있다 | createOffer()
const offer = await peerConnectionRef.current?.createOffer();
3. A는 생성한 offer를 localDescription으로 설정한다. | setLocalDescription()
await peerConnectionRef.current?.setLocalDescription(offer);
4. A는 offer를 서버로 전송한다.
if (offer) {
    sendMessage(VoiceTopic, { type: 'offer', offer: offer });
}
5. B는 서버로부터 받은 A의 offer 정보를 remoteDescription으로 설정한다 | setRemoteDescription()
await peerConnectionRef.current?.setRemoteDescription(
	new RTCSessionDescription(message.offer),
);
6. B는 자신의 media 정보를 stream에 추가한다 (1과 동일)
7. B는 answer를 생성하는데, 이때 answer에는 B의 media 정보를 담고 있는 SDP가 담겨 있다 | createAnswer()
const answer = await peerConnectionRef.current?.createAnswer();
8. B는 answer을 localDescription으로 설정한다 | setLocalDescription()
await peerConnectionRef.current?.setLocalDescription(answer);
9. B는 answer를 서버로 전송한다.
sendMessage(VoiceTopic, { type: 'answer', answer: answer });
10. A는 서버로부터 받은 B의 answer 정보를 remoteDescription으로 설정한다 | setRemoteDescription()
await peerConnectionRef.current?.setRemoteDescription(
	new RTCSessionDescription(message.answer),
);
여기까지 하면 피어들은 서로의 media configuration에 대해 알게 된다. 하지만 서로 어떻게 connect 할 건지는 모르는 상태이다. Network configuration을 주고받아야 한다.
11. RTCPeerConnection을 생성하고, 각 피어는 자신의 IP 주소와 포트 정보를 ICE candidate 객체에 포함한다.
RTCPeerConnection은 Video/Audio를 P2P로 송수신할 수 있게 한다. (c.f. RTCDataChannel는 임의의 데이터를 P2P로 송수신할 수 있게 함)
peerConnectionRef.current = new RTCPeerConnection({
	iceServers: [{ urls: 'stun:stun.l.google.com:19302' }],
});
**ICE Candidate 객체의 형태{ "candidate": "candidate:842163049 1 udp 1677729535 192.168.1.2 56132 typ srflx raddr 192.168.1.2 rport 56132", "sdpMid": "audio", // 미디어 스트림 식별자 "sdpMLineIndex": 0 // 미디어 라인의 인덱스 }
12. ICE Candidate 정보를 서버로 전송한다.
peerConnectionRef.current.onicecandidate = (event) => {
    if (event.candidate) {
      sendMessage(VoiceTopic, {
        type: 'candidate',
        candidate: event.candidate,
      });
    }
};
13. A or B는 서버로부터 받은 ICE Candidate 정보를 remoteDescription으로 설정한다 | addIceCandidate()
await peerConnectionRef.current?.addIceCandidate(
	new RTCIceCandidate(message.candidate),
);
이를 useVoiceCall이라는 custom hook으로 만들었다. 전체 코드는 다음과 같다.
export interface OfferMessage {
  type: 'offer';
  offer: RTCSessionDescriptionInit;
}

export interface AnswerMessage {
  type: 'answer';
  answer: RTCSessionDescriptionInit;
}

export interface CandidateMessage {
  type: 'candidate';
  candidate: RTCIceCandidateInit;
}

export type ISignalingMessage = OfferMessage | AnswerMessage | CandidateMessage;
import useSocketStore from '@/stores/useSocketStore';
import { useEffect, useRef, useState } from 'react';
import { ISignalingMessage } from '../types';
import { useDestination } from './useDestination';
const useVoiceCall = () => {
const { client, isConnected } = useSocketStore();
const { VoiceTopic } = useDestination();
const [localStream, setLocalStream] = useState<MediaStream | null>(null);
const [remoteStream, setRemoteStream] = useState<MediaStream | null>(null);
const peerConnectionRef = useRef<RTCPeerConnection | null>(null);
useEffect(() => {
if (isConnected) {
// 1. A는 자신의 media 정보를 stream에 추가한다.
const constraints = { video: true, audio: true };
navigator.mediaDevices
.getUserMedia(constraints)
.then((stream) => {
setLocalStream(stream);
})
.catch((error) => {
console.error('Error accessing media devices.', error);
});
// 11. Create a new RTCPeerConnection
peerConnectionRef.current = new RTCPeerConnection({
iceServers: [{ urls: 'stun:stun.l.google.com:19302' }],
});
// 12. ICE candidate 정보를 서버로 전송한다.
peerConnectionRef.current.onicecandidate = (event) => {
if (event.candidate) {
sendMessage(VoiceTopic, {
type: 'candidate',
candidate: event.candidate,
});
}
};
// Handle remote stream
peerConnectionRef.current.ontrack = (event) => {
setRemoteStream(event.streams[0]);
};
// Add local stream to peer connection
if (localStream) {
localStream.getTracks().forEach((track) => {
peerConnectionRef.current?.addTrack(track, localStream);
});
}
// Subscribe to signaling messages
const subscription = client?.subscribe(VoiceTopic, (message) => {
handleSignalingMessage(JSON.parse(message.body));
});
return () => {
if (subscription) {
subscription.unsubscribe();
}
};
}
}, [isConnected, localStream, client]);
const handleSignalingMessage = async (message: ISignalingMessage) => {
if (message.type === 'offer') {
// 5. B는 서버로부터 받은 A의 offer 정보를 remoteDescription으로 설정한다.
await peerConnectionRef.current?.setRemoteDescription(
new RTCSessionDescription(message.offer),
);
// 7. B는 answer를 생성하는데, 이때 answer에는 B의 media 정보를 담고 있는 SDP가 담겨 있다.
const answer = await peerConnectionRef.current?.createAnswer();
// 8. B는 answer을 localDescription으로 설정한다.
await peerConnectionRef.current?.setLocalDescription(answer);
// 9. B는 answer를 서버로 전송한다.
if (answer) {
sendMessage(VoiceTopic, { type: 'answer', answer: answer });
}
} else if (message.type === 'answer') {
// 10. A는 서버로부터 받은 B의 answer 정보를 remoteDescription으로 설정한다.
await peerConnectionRef.current?.setRemoteDescription(
new RTCSessionDescription(message.answer),
);
} else if (message.type === 'candidate') {
// 13. A or B는 서버로부터 받은 ICE candidate 정보를 remoteDescription으로 설정한다.
await peerConnectionRef.current?.addIceCandidate(
new RTCIceCandidate(message.candidate),
);
}
};
const sendMessage = (destination: string, body: ISignalingMessage) => {
if (client && isConnected) {
client.publish({ destination, body: JSON.stringify(body) });
}
};
const initiateCall = async () => {
// 2. A는 offer를 생성하는데, offer에는 localStream을 담고 있는 SDP가 담겨 있다.
const offer = await peerConnectionRef.current?.createOffer();
// 3. A는 생성한 offer를 localDescription으로 설정한다.
await peerConnectionRef.current?.setLocalDescription(offer);
// 4. A는 offer를 서버로 전송한다.
if (offer) {
sendMessage(VoiceTopic, { type: 'offer', offer: offer });
}
};
return { localStream, remoteStream, initiateCall };
};
export default useVoiceCall;
4. 마치면서
지금까지는 1:1 통신을 구현하는 방법이었다. 디스코드는 다대다 화상회의를 지원하기 때문에, 이를 구현하는 방법인 SFU(Selective Forwarding Unit)나 MCU(Multipoint Control Unit)에 대해서는 다음 글에서 다루겠다.
[WebRTC] 다대다 화상회의: OpenVidu를 도입하기까지의 자료조사
목차- Short Review- 1:1 통신- 그럼 다대다 화상회의는?- Kurento- Openvidu - 디스코드 클론코딩 1. Short Review - 1:1 통신지난번엔 WebRTC로 1:1 화상회의가 구현되는 flow를 정리해 봤다. 간단하게 복습해 보자
hwanheejung.tistory.com
Reference
- https://developer.mozilla.org/en-US/docs/Web/API/MediaStream
- https://www.youtube.com/watch?v=SsN4gl_wV_8
- https://www.youtube.com/watch?v=bWcNEk0H4Y0
'Projects,Activity > DizzyCode(React)' 카테고리의 다른 글
| [WebSocket] 비정상 종료 핸들링 전략 (1) | 2024.07.31 |
|---|---|
| [WebRTC] 다대다 화상회의: OpenVidu를 도입하기까지의 자료조사 (2) | 2024.07.21 |
| [DizzyCode] 디스코드 클론코딩, 시작! (12) | 2024.07.02 |
| [DizzyCode] WebSocket+JWT 시나리오 (2) | 2024.05.29 |
| WebSocket+STOMP: 개념 이해부터 구현까지 (0) | 2024.05.29 |


